The highest form of ignorance is when you reject something you don't know anything about.

Wayne Dyer (b 1940)

How to Rip & convert DVDs for: Mac / PC / iPod / iPhone / Quicktime / Linux


 I like watching movies, specially when I want to.
As I don't carry the DVDs with me at all time I find the Ripping solution much more convenient than carrying a Bunch 'O CDs and the boxes...
So if you have ever wanted to Rip a DVD and watch it later on your iPod, iPhone or on your PC / Mac, here is how in very few steps.


First and foremost, you'll need 2 (two) free applications if you are under Mac
The first one is Handbrake and the second one is VLC

Handbrake and VLC are Available for Mac, Windows and Linux.
In this post I will only go on the OS X part

Step one, Download Handbrake & VLC 


Handbrake Mac OS 10.5+  GUI


 VLC Download page

While in progress, take the time to read about Handbrake & VLC and what they can do for you.

HandBrake is an open-source, GPL-licensed, multiplatform, multithreaded video transcoder and has the ability to Rip multiple audio track at once.  i.e One movie with subtitle and 3 audio tracks (English, French, Spanish), etc ...
VLC media player is a highly portable multimedia player supporting most audio and video formats from files, physical media (DVDs, VCD, Audio-CD), TV capture cards and many network streaming protocols.

HandBrake has pre-settings ready for use with a large number of devices: iPod, iPhone, Apple TV, Mac, etc
Technicalities, output formats, encoding speed, comparison between presets are explained at the end of the post. You should take a look at it...

Shall we start? 

Install Handbrake and VLC


Insert DVD to be ripped 


If the DVD player Starts, just press ESC and Quit the application


  Start Handbrake


Click on "Source"


Select your source (i.e DVD)


Select your Preset (iPhone, Film , Normal , etc ) 
Take a look at the Preset charts to give you an idea of what is what.  (below)
You can also create your own presets by clicking on the "+" and enter your own parameters


Select your Preferences (Audio tracks, Subtitles, output format, etc ) 
Do Not touch the presets or it will cancel the Subtitles and Audio tracks preferences 


Press "Start" .... Have a little Cocktail 


You're done when...


Advanced Tab:
Don't touch it unless you like it broken or know what you are doing


Handbrake Presets
For a full list of presets, please refer to Handbrake Wiki
Universal
HandBrake's universally compatible, full resolution settings for all current Apple devices: iPod, iPhone, AppleTV, and Macs
iPod
HandBrake's low resolution settings for the iPod. Optimized for great playback on the iPod screen, with smaller file size.
Normal
HandBrake's normal, default settings.
Animation
HandBrake's settings for cartoons, anime, and CGI.
Film
HandBrake's preset for feature films.

Encoding Speed
Depending on your preset settings, you'll be able to rip at a faster pace, but it's a trade off between speed and quality. If you plan to watch it on an iPod or a full 24'' screen, you should not use the same settings. In Short: It's your choice.


Faster Preset: PSP
Slower Preset: Animation


File Size:
Smallest File Size: iPod
Biggest File Size: Constant Quality Rate


Graphs courtesy of Handbrake Wiki

Tested:
MacBookPro  2.5GHz 4GB SDRAM
2 chapters, DVD Playtime 00:10:30
iPod Preset
No sub, one audio track:
Rip Time  00:03:34
File Size  68.1 MB (68,071,935 bytes)
Film Preset

No sub, one audio track:
.MP4 output Format 
Rip Time  00:10:30
File Size 131.3 MB (131,270,808 bytes)

Constant Quality Rate Preset 

default: Quality rate 60%
No sub, one audio track:
.MKV output Format 
Rip Time  00:14:20
File Size  163.2 MB (163,237,708 bytes)


Handbrake Output:
  • File format: MP4 and MKV
  • Video: MPEG-4, H.264, or Theora (1 or 2 passes or constant quantizer/rate encoding)
  • Audio: AAC, MP3, Vorbis or AC-3 and DTS pass-through (supports encoding of several audio tracks)
What is VLC?
VLC media player is a highly portable multimedia player supporting most audio and video formats (H.264, Ogg, DivX, MKV, TS, MPEG-2, mp3, MPEG-4, aac, ...) from files, physical media (DVDs, VCD, Audio-CD), TV capture cards and many network streaming protocols. It can also convert media files, transcode and act as a streaming server over unicast or multicast and IPv4 or IPv6. It doesn't need any external codec, program or codec pack to work.

Side Notes
Ripping a DVD is time consuming, for a good quality rip (Film, Normal, Television), you may expect up to 90% more time than the duration of the movie (Constant Quality Preset)
If you Rip on iPod Preset, you'll be at 35% of the original time

Ripping a DVD is also CPU intensive: If you are using multiple CPU intensive applications at the same time, you'll experience a noticeable slow down. Also, for laptop users... don't do it while you are on battery power...;-)
The good news is, once ripped, if you watch it on your Laptop, you'll notice that you'll consume much less battery than watching it from a DVD (no need to spin the DVD for 2 hours...) hence, you'll be able to watch 2 movies in a row and up to 4 if you have the new models of MBP

A little word about Copyright:
Please, check that the law(s) of your country are allowing you to duplicate a DVD, even for personal use. You have probably already see the FBI warning on every DVD .....
http://reviews.cnet.com/4520-3513_7-5128652-1.html

As always, I do not encourage or condone illegal activities. Please, act in accordance with the law.

Don't be afraid of Special Characters

 Special Characters & Symbols on a Mac   (OS X .6.1)


I tweet,  and every single day I see someone asking how to make a hash sign (#) or an Apple sign (), even the very secret clover (CMD) sign
Then, it's the GRΣΣK Characters or the Accented Latin ones ( The é of Café).
(If you spell Café properly, you may want to ask for the "garçon" properly too, with a "ç", otherwise it's a garkon, (don't call them garkon: Not good for you!) 

Even for the general public,  looking for a ±, ‰ or ≠ can be nerve wrecking, and make you spend a ∞ of time looking for it, and I am notat anyone here.  Not even to my ♡♡♡ wife.
Ok. Enough  for the demo.
Here is how you can access all of them without going on a overload of shortcuts.

You either have, or not, on the top left of your screen something called the "Character Viewer"


For the ones without it:
Go to System Preferences (In Applications Folder)

Select "Language and Text"


Select "Input Source"
Check boxes: 
✔ Show Input menu in Menu Bar
✔ Keyboard and Character Viewer


Close Dialogue Box, and you are done!

Now everybody should have access to the Character Viewer


Just Click on It and you'll have access to all the ☀ ☠ ☢ ☤ Ω ☏ ✈☝, as well as ≤ ≥ = ≠ ≡ ≅ ≈ .... you get the picture ...

Related Characters, Manage Symbols and Add to Favorites 
Click "Character Info"  to find related characters. i.e  is related to and ♻ ♲ ♼ ♽
Click on the left box to insert the character
Use the option box to add to favorites


Tip:  
You can use the find box:  i.e if you type "mus" it will list all special characters in relation of "mus..."


Tip #2  Drag and drop the character into a document, it will automatically adjust to the correct Font and Size


Leopard User: 
You'll find this Special Character editor under Pages >> Edit >> Special Character


Symbols Available (example of. )
Currency Symbols           $ ¢ ₥ ₠ € ₣ ₤ £ ₧ ₱ ¥ ₨
Phonetic Symbols            a ɑ ɐ ɒ æ b ʙ ɓ β ð ƈ œ ɨ ɣɠ
Miscellaneous Symbols  ☏  ♳  ♻  ☕  ♕  ♖  ♗  ♌  ♋  ♍  ☤
Geometrical                     ◐ ◑ ◒ ◓ ▤ ▥ ▦ ▧ ┿ ╂ ╬ ╦ ╔ ╠ ╚ ╩ ╣
Arrows                             ↩ ↪ ↫ ↬ ↻ ⥁ ⇇ ⇈ ⇉ ⇊ ☜ ☝ ☞☟
Mathematical Symbols    ⨗ ⨘ ⨧ ⨦ ⨑ ⨊
Braille                              ⠪ ⠲ ⠳ ⠴ ⠬ ⠭ ⠽ ⠿
Enclosed letters                ㈖ ㈗ ㈘ ㈙   Ⓐ Ⓑ Ⓒ  ⒠ ⒡ ⒢ ⒣
LetterLike Symbols           ℻  ℡ ℅  ℆ ℉ ℞
Technical  Symbols           ⌭  ⌬  ⌛  ⍒  ⍋   ⍉  ⌁
Musical Symbols             ♭ ♮ ♬♫  ♪ ♩ ♯

And while you're at it, check the Symbol and Text Substitution.
You can add and create your own, for example "cdeg" will automatically being replaced by the Celsius Degree Symbol ℃. You can create your own shorthands.
Just select Text, and the +. Then ....go nuts ...


How to remove duplicates on iPhoto

If you are like me, or my wife, you probably have duplicates in your iPhoto library.
iPhoto 09 has some of protection against dummies like me, but I managed somehow to bypass them without even noticing it.
Duplicates are not very useful and can can take a lot of space. 
A very simple way to remove those duplicate is to use a shareware called Duplicate Annihilator
The shareware version "only" allows you check 500 pictures max. The full version has no limits.
( -It does not take a PhD in Computer Science to figure out how to bypass such limit..., Nevertheless, it will only cost you $7.95 for the full version. ( Cheap, no? )

Just one thing ... Do NOT play with iPhoto when Duplicate Annihilator is working. "He" does not like it...

If you want the Video Demo of the Product , please follow me here 
Little side note ... The Video is in "Real Time" but the library on the demo contains only 168 pictures

Instructions ... 

Download ... 


Install and go to preferences ...
 -Set your preferences...


Click on "Find Duplicates" ...
Grab a Cup of Joe and wait 5 min ....  Much easier than going one by one manually.


The second step, is to learn how NOT to make duplicates on iPhoto....

How To Make a Screen Copy on your Mac


Hello Tammy,  So glad to see you here :) 


6 Ways to Make Screen Copy / Screen Shot / Screen Capture  on a Mac

+ How to Make video screen capture with Quicktime

Shortcuts By popular demand ....

Direct to File

Command + Shift + 3
Takes a Screenshot of the entire screen + Saves it as a file on the Desktop
Command + Shift + 4
(Cropped)
1) Select the area
Takes a Screenshot of the area wanted + Saves it as a file on the Desktop
Command + Shift + 4 +Space (Application)
2 ways:
CMD+Shift+4, select the window or the app , press SPACE Bar
or
Select the App, CMD+Shift+4+Space Bar
with the first one, you only need to be able to see a corner of the App, does not need to be the foremost App on the screen.


Direct to Clipboard 
 (To Edit with Photoshop, as example)
Ditto as previous, just add Control (Ctrl) after Command

Command + Shift + 3
Takes a Screenshot of the entire screen + Saves it as a file on the Clipboard
Command + Shift + 4
(Cropped)
1) Select the area
Takes a Screenshot of the area wanted + Saves it as a file on the Clipboard

Command + Ctrl+ Shift + 4 (Cropped)
1) Select the area
Takes a Screenshot of the area wanted + Saves it as a file on the clipboard
Command + Ctrl+ Shift + 4 +Space (Application)
2 ways:
CMD+Shift+4, select the window or the app , press SPACE Bar
or
Select the App, CMD+Shift+4+Space Bar
with the first one, you only need to be able to see a corner of the App, does not need to be the foremost App on the screen.


How to Take a Video of Your Screen.
The new Quicktime has this feature, and to quote Mr. Gagnon: "No Bling Bling, it just work"
Just open Quicktime, go to "File" >> NewScreen Recording


Press "Record" .... et Voila!

How to Check Your Battery on a MaC

Check the Health of Your Battery

With the Time you have probably noticed that your battery does not hold the charge as well as when is was new.
The more you use it, the less it holds. So, when do you need to replace it? Can you tell in advance when it will fail?

2 simple apps to your rescue:

- The simple but very efficient Coconut Battery & the more complete iStat Pro. Good news: Both are free (Free, but a 'lil donation is encouraged *)

Coconut Battery


Coconut Battery is dedicated to your battery,
Very simple app to use and it tells you just what you need to know:
Charge, Health, Number of cycles and the original charge.
It also tell you the age of your Mac, just in case you want to have a B-Day party. :-)


Download Coconut here


You can also save the values, if you wish to track your battery health.
To Save, click on the gray arrow. I know.. hard to find ...


You can also check the others Coconut Soft while you're at it ...

iStat Pro

iStat pro is a complete monitoring system for your Mac, Disks, Networks, WIFI, CPU, Memory, Fans Speed, Processes, etc.
With Drag & Drop, you'll configure it the way you want


Download iStat Pro
(Free, but a 'lil donation is encouraged *)


Tips to extend the life of your battery
Batteries have a "memory" and it's not good....
The shorter are your charge cycles, The shorter your battery life will be.
So, Drain the battery to the lowest possible each time, and charge to the max each time, when possible, Avoid plugging -unplugging repeatedly, a 5 min charge does very little good.
To extend the duration of a charge, set your battery management parameters to "Energy Saver" , Turn Airport Off when you don't need it, and reduce the luminosity of your screen.

Glossary

Loadcycles or Cycles
The number of times where you battery entered a charge (full charge). The lower the number, the better.
mAh

milli Ampere per Hour,
The higher the number, the more powerful your battery is (capacity) I.e 6300 mAh allows 6.3 hours at 1000 mA drawing or 3.15 hours at 2000 mA.
Under very intensive use, a MacBook Pro 17" can use up to

*Donations:
You pay $48 for a gallon of Coffee at Star-Bucks, you can probably spare $3 for something that will do something good for your Mac ...

I feel safe now

From @ComputerGoddess


Yup!
I was also told that OS X is immune to both H5N1 Swine Flu & Bird Flu, hence you can SAFELY take your Macbook out in the wild without risking a contamination.

Glad we have expert watching the internet .... (Sigh!)


.

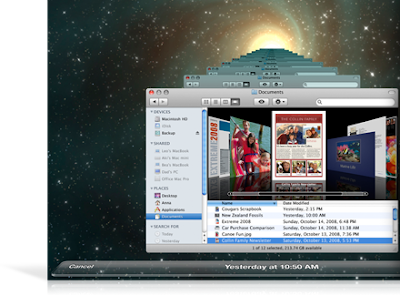
Time Machine

The Gem of OS X


If I had to praise OS X for only one thing, it would be for Time Machine.
Time Machine is a MUST for any user.
If not set up yet on your Mac , run baby run! Do it NOW! Drop everything you are doing now, and do it!

Setting up Time Machine is as simple as “ON / OFF” and it will save your life.
Go to Applications , look for Time Machine and Click “ON”
Now you can Relax…
Not Only you have a backup, but the backup of the backup, and the backup of the backup of the .. you got the message….

You just need an external hard drive, or better, if you want to splurge: a Time Capsule. Here again: Hail to Apple!
Time Capsule is a WIFI Router, dual band please, with a HDD integrated. Yes, it does your backups wirelessly every hour, and It also work with multiple stations.
For $299, you have a 1terabytes (1000Mb) backup disk and an Airport Extreme, Dual band with all the gizmos you need, including a guest account (yes, they’re guest, but it does not mean that I'll give them MY password)
Ah , also , you can have up to 50 connection at any time (just in case you run an Apple Store at home)

Do I sound like an Apple Sales Rep? At your first issue, you’ll understand…
Getting your stuff back is priceless; doing it without any fuss is bliss.

The cons of the Time Capsule are that you can not (unless you perform a deep surgery) create a partition on Time Capsule and, in the event of a repair, you’ll have to do without your airport for the time being.

The Pros are countless, just try it, at your first use of Time Machine you'll fall in love.

How to Set Time Machine Backup Interval

If you feel that one backup every hour is too much, or not enough, here is how to set the time between each backup:

FYI:
If you don't know what you are doing, don't do it.
this is "At your own risk"

Default setting: 3600 (seconds)

1) Look for a file named com.apple.backupd-auto.plist
this file is in /System/Library/LaunchDaemons
Or use Spotlight to find it for you

2) open this file with your text editor
3) BEFORE you edit the file, make a copy, just in case ...
4) look for the following:
(CTRL-F makes it easier)

5) Change 3600 in the number you want i.e. 1800 for 30 min
5400=90 min 7200=120 min etc ...

6) Save file, et voila!

Just be aware: The greater is the interval, the larger (and longer) the backup will be. >> 99999 is not a good idea...